Thursday, March 7, 2013

Jeans and Hoodie Mash-up!

So as usual I have lots of mending to do, and often it doesn't get done in a timely manner. My son's favourite hoodie from two years ago needed a new zipper and the cuff was ripped. At this point it is too small to bother mending and my son has a new favourite hoodie. The pants were ripped (and perhaps helped by scissors?) before Christmas and still fit, but could be a little longer. I could have just mended the knees, but I decided to combine the two!


My inspiration for this was this pin that I found on pinterest


To be honest I didn't read the instructions in the blog, I just used the image for inspiration. First I cut off the pants above the knees and the jacket below the armpits. 


I laid the sweatshirt fabric below the top cut on the pants to determine the width. I saved enough of the bottom leg so that it would give me a little more length when it was all sewn together. I had to taper the sweatshirt material a little at the bottom so it would be the same width as the bottom of the leg.


I sewed up the side seam of the sweatshirt material and made a tube. I sewed the tube sides together with the top cut edge of the pant.  It's a good idea to sew this with a wide basting stitch so you can turn it right sides out and check to see how it worked.


It looked like this when I turned it the right way out. Okay, it looked like this the second time I turned it right sides out. (Thank goodness for the basting stitches I did!)


I repeated the process for the bottom piece of the pant and checked that it fit as expected. Yay, it did!


 I turned the leg inside out again, folded the seams open and sewed them that way. I repeated the process for the other leg and also applied the crest from the jacket to the pants.

PS. My son seems to have a thing for helping rips along with a pair of scissors.


See here for how this pair was mended

Monday, July 30, 2012

And I ran out of carpet cleaner....

So the hall mat that I carried upstairs to rinse because it had coffee spilled on it left a trail of dirt and coffee drips all the way up. I pulled out the bottle of Bissel Carpet Foam Cleaner and scrubbed my way down 8 stairs... and then I ran out.

What next? Some DIY websites suggested vinegar and water, ammonia and water, clear dish soap and water on a cloth or a paste of baking soda and vinegar. I tried a spray bottle of vinegar and water and a Rubber Bush I got at a Norwex party. I sprayed lightly, brushed and blotted with paper towel. Neither the Bissel, nor the vinegar entirely removed coffee/dirt drips and the stairs looked dingy as well.  I tried making a foam of dish soap and water -- no real improvement.

So I decided to make my own Resolve style Deep Clean Powder. I had bought the Resolve once, but returned it after reading that I had to brush it on with a special applicator. I put some baking soda in a shallow pan, sprayed lightly once or twice with the vinegar spray to make it damp and then sprinkled on and brushed it in with my rubber Norwex brush.

I am still waiting for the stairs to dry so I can vacuum and see the results. I think this will require some further testing. (I have a small set of stairs going to the basement.) But I am hopeful that this will improve the look of the carpet.

A side note about the Norwex Rubber Brush. I LOVE THIS PRODUCT! It's particularly good at removing pet hair from the stairs that the vacuum did not remove. I used it last week to clean out the car. It requires a little elbow grease, but still easier in my opinion than dragging the vacuum outside.


Update: I went back and stain treated the coffee stains that didn't come out with the Bissel spray. I used a solution of a small amount of liquid laundry detergent and water and rubbed it in with a cloth. I rinsed with a small amount of water and blotted dry -- stains are gone!

The homemade Deep Clean powder didn't appear to make much difference. Can you guess which side I treated?

Before....

After...


I treated the right side!  Here is what the baking powder looked like after I spritzed lightly with a solution of vinegar and water


Here it is sprinkled on the right side .... 


Here it is brushed in ...


I let it dry for an hour and then vacuumed. 

I found a recipe online that uses baking soda, corn starch and baking soda which I may try. 


Tuesday, July 24, 2012

"New" Shoes for Hannah (Update: FAIL)

Having three daughters, the youngest often only gets something new if the hand-me-downs are completely worn out. This pair of shoes are on girl #3 or #4. They came from my niece, but may have belonged to my eldest daughter before that. Since then, they have gone to my middle daughter and now to my youngest. They actually looked worse, however I already cleaned them with a Magic Eraser before taking this photo.


I

 gave them a fresh base coat of white acrylic craft paint to brighten them up and hide the scuff on the toe. In this photo the shoe on the right  has already been  done and looks much better than the one on the left. I even brushed lightly over the sparkly butterfly to hide some of the dirt. 


I let the paint dry 20 minutes or so and taped off the areas I didn't want to get glitter on. I used green painter's tape, but it's not sticking as well as I would like. I would use regular masking tape in the future. 


I applied the glitter glue with a paintbrush. I bought this crystal coloured glue at DeSerres (http://www.deserres.ca/en-ca/search/glitter-glue/S548/). Some blogs recommend using Modge Podge and mixing in your own glitter. I also wondered about using the Tulip Sparkle paint (especially for canvas shoes). Even after only one coat this is looking pretty, but I'm glad I used the acrylic paint first. I plan to add more coats and an accent colour for the eyelets and butterflies.


I have been letting the shoes dry for an hour between coats of glitter. I have been using a toothpick to open up all the little holes. At this point there are four coats of crystal glitter on the body of the shoes and one coat of pink glitter on the butterflies. I used the bottle to squirt the pink glitter directly into the large eyelets and for the body of the butterflies. 


I used the tip of a sharp along  the edge of the shoe to break the seal that the glue made before removing the tape. I touched up the crystal glitter where necessary and did a second coat of pink glitter on the butterfly wings. 


I am really pleased with the results. They look like new pair of shoes! The crystal glitter did not give complete coverage, but it is hard to tell on white shoes. 


FAIL Update: She wore these on Saturday morning for about an hour and the glue began peeling where the shoes creased. I'm going to see if there is a way I can fix this. 

2013/03/07 -- Ok, i didn't get these fixed up, and she's probably outgrown them.  Here is a link to the original instructions I looked at. This seems to be the way to go. http://www.instructables.com/id/How-to-glitterize-a-pair-of-shoes/#


Wednesday, November 30, 2011

That experiment was FAIL! Sort of....

Back in August I started getting rid of 105 things every day and was blogging my progress. I managed to make it 80 days (well almost, I missed a few days) before I gave up entirely. It was not a loss though, that's nearly 1200 items gone out of my house!

Going through this activity was a real eye-opener. I knew we had a lot of stuff, but WOW we have a lot of stuff! I have also learned where my areas of weakenss are with respect to getting rid of stuff.

1. Sentimental: This is the hardest stuff to get rid of. Even if it is something that is broken, or no-longer used it is hard to get rid of because of the memories.

2. It is worth something: I hate getting rid of something that was costly. I've sold a few items, but that is a lot of work. I just have to keep in mind that when I give items away I am blessing the people/charities that are receiving the items. (PS. If I offer you something, only take it if you need it, want it or love it, otherwise it is not a blessing)

3. I don't know what to do with it: I have odd slippers, parts of games, etc. which are particularly frustrating. I have been trying for years to mate these items without success. Generally I can't remember where I put them or the kids have gotten into them before they can be reunited. I need to be ruthless in getting rid of this stuff.

4. I start, but don't follow through: Particularly when we work on the basement, we end up gathering items to give away or throw away and then they sit there. So next time we do a purge we end up finding stuff that should already have been dealt with.


Thursday, May 5, 2011

Having my Cake and Eating it too!

I've want to learn to decorate cakes for years. Before I was married I bought a piping bag and tips from a kitchen store, but it took me a couple of years before I got around to trying them.

I got my first instruction on cake decorating from a friend who had taken the Wilton course. She helped me to make my daughter's cake for her 4'th birthday. A ballerina bear in a VIBRANT pink tutu.

As our family has expanded and my kids have gotten older I have continued to make and decorate cakes as a less expensive option to the store bought cakes.

This one was made using a mix, canned frosting,
sprinkles and candies, and fruit roll-ups. 


Also from a mix and pre-made frosting.
I made this for my second daughter.
I always wanted a Barbie cake as a kid. 


My eldest daughter has been helping me decorate cakes for a couple of years now. Most we have used mixes and pre-made frosting, but have actually made our own fondant. (Mainly because I couldn't justify the cost of the pre-made)


Perry Cake -- based on the pet platepus from
Disney's Phineas and Ferb. 

Finally schedules aligned so that I could take the course and my eldest is taking it with me. We've learned a lot on our own, but I thought it would be nice to learn some tips and tricks.


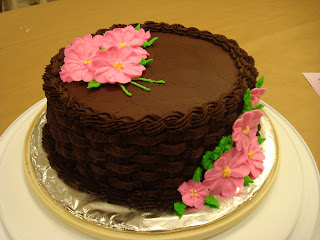
One is mine, and one is my Daughter's. 
Can you tell whose is whose?

She didn't take the second course with me which was making sugar flowers. 


But she did continue making and decorating cupcakes on her own. 

Tonight we start the fondant course. We'll be working on more sugar flowers, but using fondant instead of royal icing, and learning how to work with fondant. 

I'm starting to get asked to make cakes now, and have three cakes to make in the next two weeks. On top of that I am going to make a cake for Mother's day and a pot-luck in two weeks. 

I'm going to try out a new frosting recipe today. My husband finds the decorator buttercream too sweet. After the first couple of lessons he asked if I could take a pie course instead. I told him if he found a place offering one, to just sign me up! 

Friday, September 24, 2010

It was only a little hole when he left the house ...

It looked to Mom like he had put a pencil through the leg below the thigh. She didn't mend it right away and.....


..... this is how it looked when he came home!

Mom: What happened?
Son:  It was an accident!

Yeah, an accident with a pair of scissors, and much ripping!!!

I've gotten pretty good at mending, but seriously, this is a little much! The obvious choice is to make them into shorts, but the challenge of mending a "rip" of this magnitude is just screaming out to me!

At least the other pair I have to mend this week is actual wear on the knees!

I bought him a couple pair of jeans on sale before school started. "But I don't need any" he said. I'm so glad I did, but i probably should have bought more.

I've also had to mend my daughter's Jeans and hoodie this week which is unusual.


Update later in the day....


TADA!

I used fusible interfacing to attach the pieces together and then went over the edges several times with zig-zag stitches. I used a full bobbin of thread! I found that there was a piece missing so I left the opening rough and sewed in a piece of flannel from ripped pj's behind the hole. The edge of the opening should fray nicely after a wash or too. I'm tempted to go around the opening with red thread for added detail.

Wednesday, September 22, 2010

Lunch Insanity! (and it's only the third week of school)

The k-6 school that two of my kids go to has switched to a balanced day where they have two 40 minute breaks during the day. At each break they eat half their lunch and then go outside. They seem to be eating more than when they were getting lunch and two recesses. My 12-year-old is in middle school and only gets one lunch break/recess and is starved by lunch but sometimes runs out of time to eat the whole thing. 

Lunch is a frustrating topic for me. The first problem is that we cannot send anything with nuts or peanuts. They are changing board policy regarding bringing in food for the whole class on special occasions. It's not official yet, but the school has asked parents not to send in cupcakes on birthdays.  I can't send seafood with the youngest due to an allergy in the class. I was not told that it was a school wide ban -- not that my kids would eat tuna or salmon, "it's too stinky"!

On top of that, my eldest has become picky about lunch. Cheese bun ok, cheddar cubes ok, cheese strings not ok, ham rolls ok, crackers not ok, ham may go on nice bread or cheese bun, but not on white bread or dinner roll. NEVER put a cheese on any sandwich and no whole wheat bread EVER. No fruit gummies, but fruit roll-ups and craisins are okay. Bagels and mini-croissants are good. Apparently "Zebra Bread" is the in thing at middle school. It's a swirled light and dark rye. It had to be white bread when I went to school, unless you wanted to be mocked. 

Sesame Street snack cups are cool with my 12-year old and 4-year old girls (my eldest also has a cookie monster courier bag for school), but not for my 9-year-old son -- he has plain orange snack cups. I had to get an Elmo snack cup for my 3-year old daughter too, even though she is not in school. 

Apple slices and rings are cool, whole apples are not -- they are so last year! I dip them in OJ or lemonade or lemon/lime soda to keep them from browning. 

Veggies are not well liked -- unless I send "Toonies" (insert carrot into cucumber and slice). Although, my 12-year-old does like celery sticks. 

Bananas, seem to be ok, except that they get smooshed. My eldest has a metal lunch box, so she can take them. I have seen banana cases you can put them in to keep them safe,  but can't be bothered -- eat the bananas at home! I was mocked for taking bananas to school. 

Boiled eggs and pickles were ok in the past, the kids haven't asked for them this year. I don't often send them, because I was mocked. I should probably boil some eggs since they like egg salad. It will be a nice break from ham or turkey slices

Soup, mac'n'cheese, Zoodles are good, I don't know if brown beans are still okay. I send a hot lunch at least once a week when I run out of sandwich fixings. 

Yoghurt, pudding and fruit cups are okay. They weren't interested in the pudding and fruit cups last year. 

Sometimes I send "snack lunch" -- just extra snack items in place of the sandwich. 

I sign the kids up for the pizza, hotdog and sub days. It's one free day, where I don't have to think about what's for lunch!

.... AND WHY CAN'T THEY EMPTY THEIR LUNCH BAGS WHEN THEY GET HOME!  I've only been nagging the eldest two for 6 and 9 years respectively! I'm trying a new idea this year. I load up the sink with soapy water as soon as they get home and announce that I need the containers from their lunch so I can wash them. If we still do not have compliance they will be washing their own containers!